A leaky roof can turn a minor annoyance into a major headache, causing water damage, mold growth, and structural issues if ignored. In College Station, TX, where heavy rains, hail, and high winds are common, acting fast is crucial to protect your home. This guide covers everything from spotting leaks to quick DIY fixes and knowing when to call pros. You’ll learn simple steps using common tools like tarps, sealants, and roofing tape to stop drips temporarily.
While permanent repairs often need experts, these tips help minimize damage until help arrives. Understanding leak sources like damaged shingles or flashing prevents small problems from escalating. Safety first: use ladders carefully and avoid steep roofs. Follow these steps for effective roof leak repair tailored to local weather challenges. Quick action saves money and keeps your family dry.
Common Culprits Behind Roof Leaks
Roof leaks in College Station, TX, arise from material fatigue and local weather extremes like intense humidity, sudden downpours, and gusty winds. Asphalt shingles degrade faster here, curling or lifting to expose underlying layers.
Inspecting Shingle Wear
Scan for granule loss on walks bald spots signal erosion from UV and rain. Note lifted tabs, fractures from wind gusts, or hail dents as bruises. Missing pieces reveal underlayment; early replacement halts water entry and granular debris in gutters.
Probing Flashing Failures
Examine metal strips at transitions for corrosion, separation, or lifted edges. Test seals around pipes loose, eroded vent boots invite intrusion during gales. Cracked chimney flashing channels runoff inward; reseal gaps promptly to restore watertight barriers.
Simulating Storm Inflow
Hose-test systematically from eaves upward, observing attic flow patterns for fresh drips. Pair with flashlight checks for rafter stains. This pinpoints hidden paths water takes, distinguishing surface cracks from deeper deck issues before interior harm spreads.
Quick Temporary Fixes
- Plastic Tarp Method: Cover the leak source with heavy-duty tarp. Stretch tight and secure edges with 2×4 lumber or staples to withstand winds. This diverts water effectively until pros arrive.
- Roofing Tape Application: Apply waterproof repair tape over cracks or holes in shingles. Press firmly for an instant seal; it bonds to wet surfaces.
- Sealant for Small Gaps: Use roofing cement or caulk on minor cracks around flashing or vents. Smooth with a putty knife for a watertight barrier.
- Container Indoors: Place buckets under interior drips to catch water. Empty regularly and use fans to dry areas, preventing mold.
- Clear Gutters: Remove leaves and debris to ensure proper drainage, stopping overflow that worsens leaks.
These buy time during storms but aren’t permanent. Essential tools: tarp, tape, sealant, hammer, utility knife, gloves, goggles.
Essential Tools and Materials
Keep a basic kit ready for emergencies: tarps or waterproof sheeting, roofing nails, hammer, self-adhesive flashing tape, sealant or caulk, utility knife, scissors, safety gloves, goggles, and sturdy ladder. These handle most temporary patches. For interiors, add buckets, fans, and dehumidifiers. Non-slip shoes prevent falls.
Store in a garage for quick access. Quality sealant adheres to wet roofs and stays flexible. Roofing tape works on various surfaces without peeling. Always prioritize safety gear to avoid injuries on slippery surfaces.
Step-by-Step DIY Repair Guide
Safety first: Work only in dry weather using stable ladders, non-slip shoes, and harnesses. Never attempt repairs alone on steep pitches to avoid falls and injuries.
Locate the Leak Safely
Inspect the attic for dark stains or damp spots first, then check the exterior directly above. Use a flashlight to trace water trails along joists and rafters precisely. Perform a hose test from eaves upward, watching inside for fresh drips to confirm exact entry.
Prepare the Area
Clear twigs, leaves, and loose debris gently with a soft broom to avoid further damage. Pat the surface dry with towels if possible for optimal sealant adhesion later. Pry up only necessary damaged shingles minimally; gather tools like nails, tape, and caulk nearby.
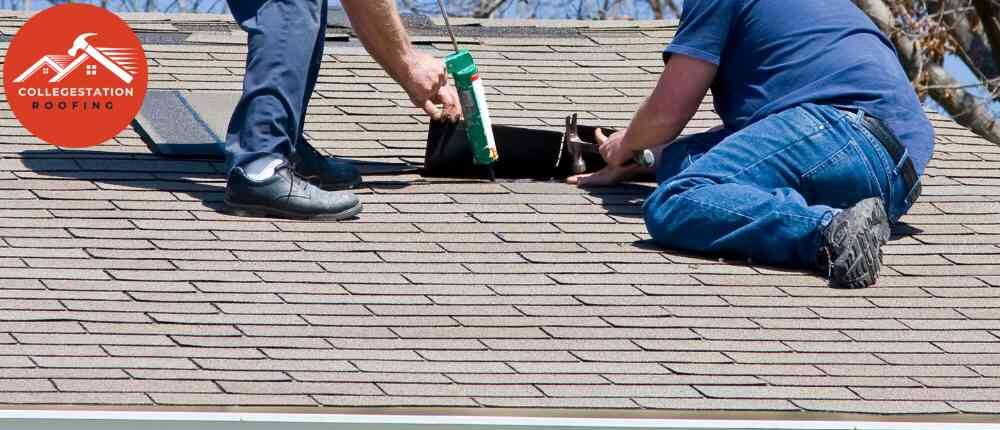
Apply the Fix
Spread roofing cement generously over holes, cracks, or gaps using a putty knife. Lift adjacent shingle edges carefully, slide matching patches underneath, nail securely in place. Seal all seams thoroughly and press waterproof tape or flashing firmly for immediate waterproofing.
Clean Up Inside
Scoop out standing water promptly with buckets or towels to prevent pooling. Run fans and dehumidifiers for thorough drying, inspecting closely for early mold growth. Empty drip containers frequently; monitor the area during the next rain to ensure patch integrity.
When to Call a Professional
DIY works for minor leaks, but pros handle complexity.
| Signs | Description | Why Pro Needed |
|---|---|---|
| Multiple Leaks | Water in several spots or pooling. | Indicates widespread deck or structural issues. |
| Sagging Roof | Visible dips or heavy damage. | Risks collapse; requires full assessment. |
| Persistent Drips | Fixes fail after patching. | Hidden underlayment rot or flashing failure. |
| Steep/Flat Roofs | High pitch or membrane problems. | Specialized tools and safety gear essential. |
| Storm Damage | Hail dents, wind-lifted shingles. | Insurance claims and matching materials needed. |
FAQs
Can I fix a roof leak myself?
Yes, for small cracks or holes apply roofing sealant, cement, or waterproof tape temporarily to stop drips. Complex issues like damaged flashing, multiple leaks, or structural damage require expert roofers for safe, lasting repairs.
What’s the best sealant?
Roofing cement seals shingles and cracks effectively, staying flexible. Silicone caulk works best around vents and pipes for watertight bonds. Flexible waterproof tape offers quick patches on wet surfaces without tools. Choose based on location.
How much does repair cost?
Average $300–$1,000 for minor to moderate fixes, varying by damage size, materials, roof pitch, and labor. Small patches cost less; extensive work or replacements reach $1,500+. Get multiple quotes for accuracy in College Station.
Does insurance cover leaks?
Often covers storm-related damage like hail or wind; excludes normal wear-and-tear or poor maintenance. Document leaks with photos, attic stains, and timestamps promptly. File claims quickly; pros help assess coverage for approvals.
Final Thoughts
Fixing a leaky roof starts with quick identification and temporary patches to halt damage. In College Station, TX, regular inspections after rains prevent escalation from small drips to major repairs. Use the tools and steps outlined for safe DIY efforts, but recognize limits multiple leaks or structural signs demand professionals. Proactive maintenance like gutter cleaning and branch trimming extends roof life.
Invest in quality materials for lasting seals. Schedule biannual checks to catch issues early. This approach safeguards your home, avoids mold health risks, and controls costs. Stay vigilant against local weather; a dry roof means peace of mind year-round. Contact local roofers for inspections to ensure long-term protection.